
Introduction
This article provides an overview of the features available in the Lofty Real Estate App.
Overview
Login Page
We added two login methods for mobile users: Biometric and Pattern Lock.
Navigate to the app settings → Account & Security to modify the login method. You can enable either FaceID/TouchID or Pattern Lock.
Face ID (iOS only)
If you have not already set up FaceID on your device, there will be a pop-up that guides you through configuring FaceID. Once this is done, you can then go back to the Lofty app and turn on Face ID.
Notes: If you have a phone that does not support FaceID, you can set up Touch ID in the same way.
An iPhone can have either FaceID or Touch ID, not both.
Fingerprint Unlock (Android)
Face Unlock is not currently supported for Android phones. If you have not already set up a fingerprint unlock on your device, enabling this option will walk you through setting it up first, just like FaceID for iOS.
Pattern Lock
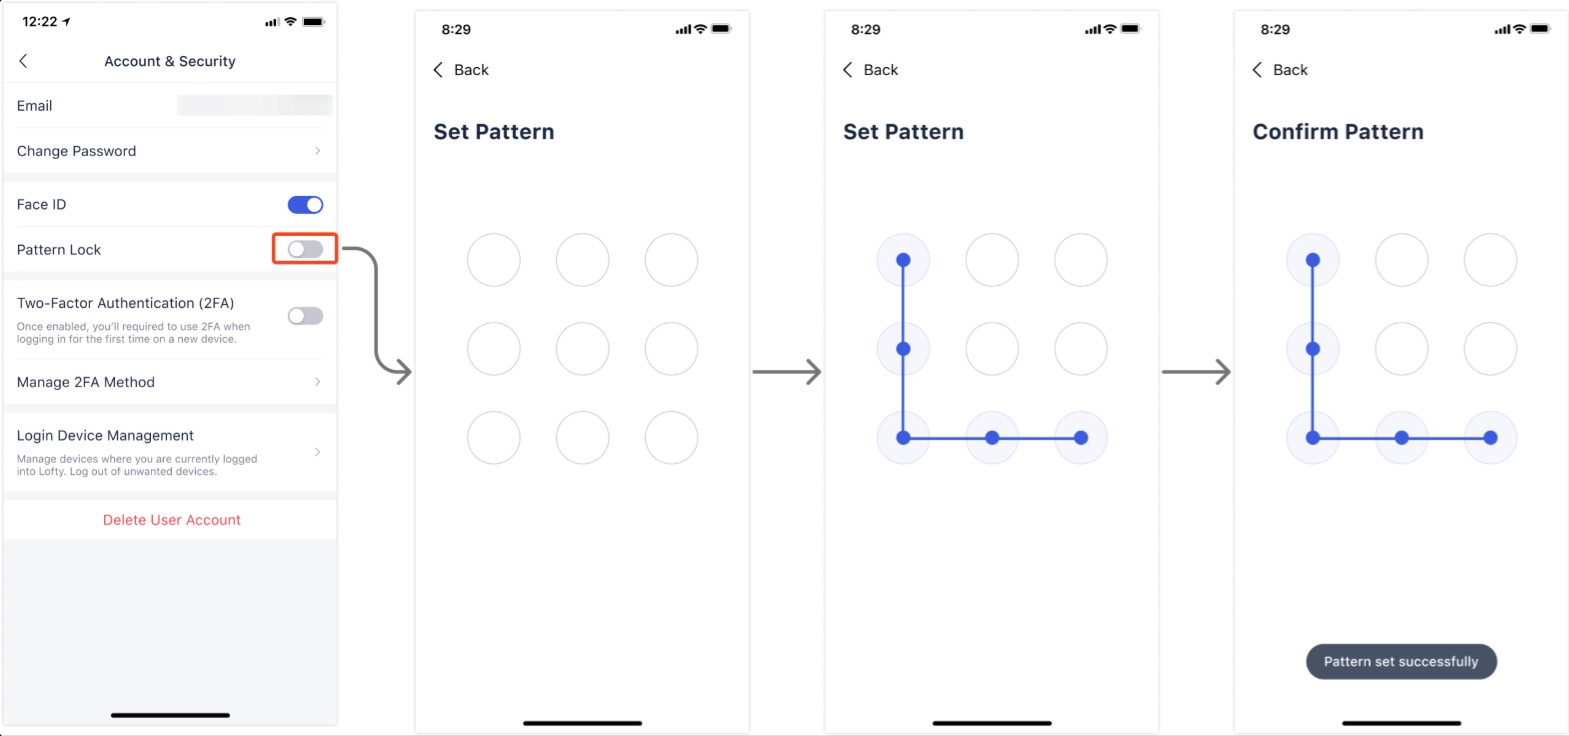
When turning on the Pattern Lock switch, you will need to choose a pattern, then verify it. If you have set up a pattern lock for your phone before, you will need to set up another pattern lock for the Lofty app. The app will not unlock with your phone's pattern unlock by default. You can, however, set up the same pattern lock if you want to.
Settings
The Settings icon will take you to your Lofty mobile app settings. Here, you can make any needed changes to your Lofty mobile app experience.
Navigate to Account & Security to set up alternative login methods, two-factor authentication, or to reset your password.
Mobile Dashboard
A notification chat called "Your Priorities" can be muted or pinned. Every day at 8 a.m. in your time zone, we will push a notification through the chat to guide you to go into the mobile dashboard.
- We support new leads, opportunities, need to follow-up, tasks, transactions, appointments, and showings.
- You can switch to different categories to view your work.
- And can switch the time filter between “today” and “this week”.
- For leads, swipe left can either text, email, or call the leads
- For appointments, swiping left can complete or postpone the appointment.
Chat Page
Use this page to manage and respond to messages.
- Text communication with leads
- AI Assistant messages (if applicable)
- Individual and group messages with other users on your same Lofty account
You can use the search feature to easily find specific messages.
All notifications will also be located on this page:
- Unknown Inbound
- Showing Assistant
- Opportunity
- New leads
- Reassigned leads
- Task Reminders
- AI Assistant notifications
- Community
- Transaction
People Page
The Lofty app categorizes your people into two categories: Leads and Contacts.
- "Leads" are Buyers, Sellers, Renters, or Others. These people sync with the web app.
- Leads can be shared with Contacts.
- "Contacts" are other agents on your team or in your MLS. The Lofty app makes it easy to communicate with your peers.
Listings Page
The listing page will be identical to the web version of Lofty. The Discover tab will have the same functionality as the web app's All Listings page.
You can view and share your listings in the My Listings tab.
Listings can be shared with other agents, leads, or you can generate a showing link.
When sharing listings with a lead, you have the option to filter by leads who are Matched Buyers or by All Leads. You can also copy the URL to the listing to share on social, or send via email by clicking on the arrow in the bottom right-hand corner. Using this option will generate a short URL that is friendly for sharing.
Add Property in Mobile Email Sending Process
In the mobile app, when sending an email to leads;
- You can select multiple listings.
- After insertion, the listing appears as a variable on the editing page. But after sending, it will become a listing card in the email body.
Social Studio
Currently, this version only includes the basic functions of Social Studio, including:
- Authorizing social accounts
- Posting/ scheduling posts
- Tracking engagement data of posts
Excludes feature:
- Automatic post settings and display
- Package upgrade
- Boost post-related functions
To access the Social Studio, click the More menu next to the website icon.
Social Accounts Authorization
If you are a new user, you will first see the authorization page.
Authorized users can access the Account Management page through the icon in the top right corner. From this page, you can perform actions such as connecting, removing, or refreshing the social accounts. The authorization status is synchronized between the web and mobile.
Post Dashboard
When there are no sent posts, an empty state will be displayed to guide users to create posts.
When there is content available, it will be divided into two tabs: one for sent posts and another for scheduled posts.
Sent: from the most recent to the earliest.
- Post time
- Post content: text, image, video, or link preview
- Engagement data: same as web, including impressions, clicks, and engaged leads
- Post channel: The grey icon means it failed to send the post to a specific channel.
- Action:
- View post content on a social channel
- Delete
- Scheduled: from future to most recent
- Scheduled post time
- Post content
- Post channel
- Action:
- Edit
- Delete
Create Post
Operations are close to the web version.
- Click the Social Studio icon
- AI will provide a prompt
- Edit content
- Choose social channels
- Click the Publish button
All Other Features
All other features will be identical to the web version of Lofty.
Questions?
If you have any questions regarding this topic or any others, please reach out to our Support Team via email at <support@lofty.com>, by phone at 1 (855) 981-7557, or by chat through your Lofty CRM.
Comments
0 comments
Article is closed for comments.