

Introduction
*Please note that the availability of certain features outlined in these release notes will vary depending on the package and add-ons you have purchased and the account type you have (admin/agent user). For any questions related to your Chime package or feature availability, please contact Chime Support (support@chimeinc.com).
Release Date
Tuesday, August 16th, 2022
Summary
- Lender Updates
- Chime CMA optimizations
- Custom Font
- Social Studio: Video Post
- Enterprise Lead Routing & Re-Routing
Lender Updates
Agent Users Can Invite Lenders to Add Payment Cards
Every user now has the ability to trigger an email to a lender, who has already activated their lender-type Chime account, to invite them to add a payment method on file with Chime to prepare for cost-sharing.
This option will only be available for a lender if they do not already have a payment method on file with Chime.
Also, when inviting a lender for the first time, you can now check the box to have lenders add their payment information as part of the lender-type account creation process as well.
When the lender receives the invite and selects the option to add a payment method, they will be redirected to the Chime platform Billing Center to do so:
Learn More:
Billing Center: Invoice Management
Limited Chime Marketplace Added to Lender-Type Accounts
When accessing Chime via a lender-type account, you will now have access to the Chime Marketplace. You will currently only see the following options:
- Facebook Dynamic Ads
- Google PPC Ads
- Facebook Seller Ads
Clicking any of the options in the Chime Marketplace will create an internal ticket for the Chime Ads Team to reach out and provide more details on setting up cost-sharing on a lead generation campaign.
Chime CMA optimizations
User Interface Changes
Next time you access the Chime CMA, you will notice that the creation process has changed slightly. The overall functionality is the same, but the design has changed a bit with this new update.
Here are just a few samples of what the changes will look like, the biggest one being that the CMA steps are now to the left instead of across the top:
CMA Style Redesign
The CMA report style has been improved with this update as well. All the same, pages exist, but they have been cleaned up and made to present better to your leads when you send it to them.
Here is a sample of what these new designs look like:
A few notes:
- Any existing web CMAs will automatically be changed to match the new style
- Any existing PDF CMAs will not be changed to the new style unless the PDF is regenerated
Learn More: CMA Tool / Chime CMA
Custom Font
You can now upload custom fonts to use on your Chime website!
To find this new setting, navigate to CMS > Editor > Style > Font:
Use the primary Font option to select a font that you would like to use as a global font on your website:
Use the three drop-down menus to get very specific, if you would like to select a specific font in any of these locations and make it different from the rest:
- Titles
- Paragraphs
- Buttons
To upload a custom font you can either hover over the "?" icon and select the hyperlink or when you are accessing any of the drop-downs on this settings page, click on the Upload Fonts button.
Before being able to upload, you must verify that you have the rights and permission necessary to use this font on your website. This is your responsibility to research.
Once you have uploaded custom fonts, they will be available to manage from this same location:
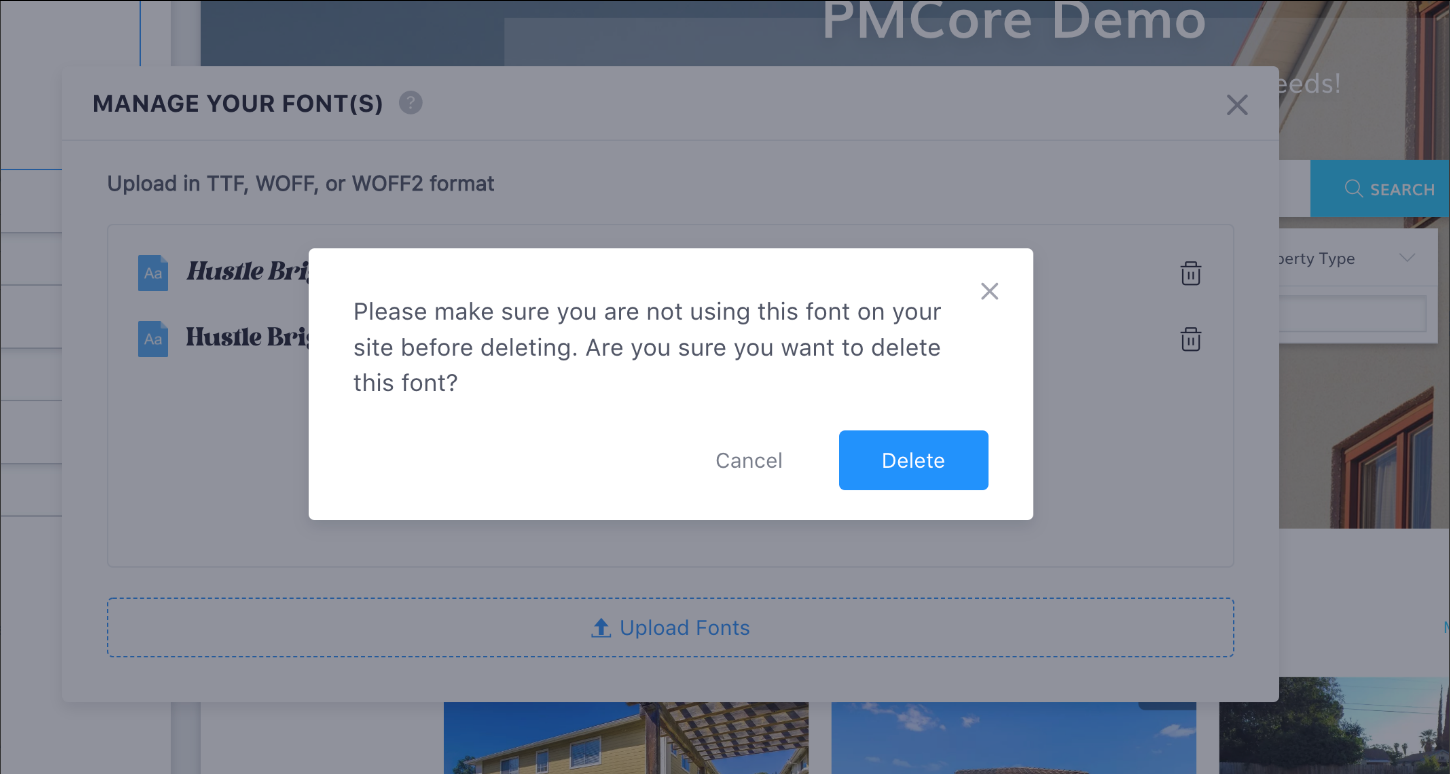
Before deleting a font, make sure that you are not using it anywhere on your website as deleting it could cause display issues. You will be prompted to confirm when deleting.
If you delete a font that is being used, the site will continue to use that font but it will no longer be displayed as an option to use elsewhere.
Any custom fonts that you have uploaded will be available under My Fonts:
Custom fonts can also be utilized directly in individual blocks once uploaded.
Social Studio: Video Post
You can now upload videos to your social channels using the Chime Social Studio.
When creating a post, you can only upload a video or photos, not both together. Only MP4 format is supported and the file can only be a maximum of 50 MB in size.
To upload a video on a post, simply choose the upload option and then browse for your video:
Learn More: Social Studio
Enterprise Lead Routing & Re-Routing
We have optimized Enterprise lead routing to make sure that leads can be distributed within the customizable hierarchy that can exist within Enterprise accounts.
The main setting that has been optimized is found under Settings > Lead Routing > New Leads:
There are three tabs at the top:
- Company Owner
- Group Owners
- All Others
Company Owner
Use these options to customize which leads are routed if they enter in via the Company Owner's integrations or the Company Website:
Group Owners
This is where the most significant changes take place with this release.
*IMPORTANT: Remember that setting changes made here apply to all groups on the account.
For all of the available options, you can now select between the following:
- Company Routing. Leads will be routed by Company Scope lead routing rules.
- Group Routing. Leads will be routed by Group Scope lead routing rules.
- Advanced Settings. See below.
For Advanced Settings, use this option if you would like to choose company vs. group differently for each of your groups:
All Others
Use this setting to customize whether leads from lead sources integrated by individual users should be routed via lead routing or not.
Leave it unchecked if these leads should just be assigned to the user who has the lead source connected. Check if those leads should also go through lead routing.
Remember, these settings apply to all users (other than the Company Owner and Group Owners).
*IMPORTANT: As a reminder, only users with the Manage Lead Distribution permission can edit these settings.
Re-Routing Rule Optimizations
With this update, the display of re-routing rules will now look like this:
Permissions
Only users with the right admin permissions can edit re-routing rules. Prior to this update, anyone could edit re-routing rules.
- Team Instances: "Team Features" permission is required.
- Enterprise Instances: "Manage Lead Distribution" permission is required.
- Those with access to edit lead distribution for "Entire Company" can edit all re-routing rules.
- Those limited to editing only for "User's Group" will only be able to edit re-routing rules for their group/subgroups.
Learn More: Team Permissions
All Distribution Methods
Re-routing now supports both Round Robin and Next Up. Prior to this release, only Blast Alert was supported. Detailed explanations of each of these have been added.
Enterprise Only "Available To" Setting
With Enterprise, an additional option called Available To allows you to segment which specific groups inside of the Enterprise hierarchy will have access to each re-routing group that is created.
With this setting, users in the selected groups will be able to see this specific Re-Routing Group as an option when re-routing via a lead's profile. If a user is not part of a selected group, they will not see this as an option to re-route in a lead's profile.
Learn More: Enterprise Edition - Lead Routing
Questions?
If you have any questions regarding this topic or any others, please reach out to our Support Team via email at <support@chimeinc.com>, by phone at 1 (855) 981-7557, or by chat with us through your Chime CRM.
Comments
0 comments
Please sign in to leave a comment.